29 May 2017

I had a requirement to get second and forth Saturday in a month.

Here is a SQL Server query which allow to get it done.


select *
    from (
    select datein2n4,
               datename( weekday, datein2n4 ) as wkdy,
               row_number( ) over ( partition by datepart( month, datein2n4 ), datename( weekday, datein2n4 ) order by datein2n4 ) as rn_dy_mth
        from (
            select dateadd( day, rn, cast( '2017-05-29 00:00:00' as date ) ) as datein2n4
            from (
                select row_number() over( order by object_id ) - 1 as rn
                from sys.columns
                ) as rn
            ) as dy
        ) as dy_mth
    where rn_dy_mth in ( 2, 4 )
      and wkdy = 'Saturday'
    order by datein2n4

26 May 2017

Creating Database using Amazon RDS is very eary.

See detailed documentation about creating a Microsoft SQL Server DB Instance and Connecting to a DB Instance

After that you can connect SQL Server from SQL Server Management Studio.

Amazon automatically configured Inbound permission to the IP from which it is created from.
While connecting from other PC or Hosting server you will receive bellow error:

A network-related or instance-specific error occurred while establishing a connection to SQL Server. The server was not found or was not accessible. Verify that the instance name is correct and that SQL Server is configured to allow remote connections. (provider: Named Pipes Provider, error: 40 - Could not open a connection to SQL Server) (Microsoft SQL Server, Error: 53)


Also connection Asp.net website you need to apply Connection String by:


Solution : 
 You need to apply  INBOUND rules for permission to that IP

In Security Group option


You can use WhatIsMyIp.com to get Source IP address.
Amazon has its own Check IP website : http://checkip.amazonaws.com/


Thanks

25 May 2017

Amazon Web Service EC2 configuration is very very easy!
Its totally free service.

EC2 stands for Amazon Elastic Compute Cloud.

URL : https://console.aws.amazon.com/ec2

Help : https://aws.amazon.com/documentation/ec2/

Select EC2 :

Resource Summary Page: 
Click on "Launch Instance"

Choose an Amazon Machine Image (AMI), Operating System Selection:
An AMI is a template that contains the software configuration (operating system, application server, and applications) required to launch your instance. You can select an AMI provided by AWS, our user community, or the AWS Marketplace; or you can select one of your own AMIs.

Choose an Instance Type :
Amazon EC2 provides a wide selection of instance types optimized to fit different use cases. Instances are virtual servers that can run applications. They have varying combinations of CPU, memory, storage, and networking capacity, and give you the flexibility to choose the appropriate mix of resources for your applications. Learn more about instance types and how they can meet your computing needs.


Configure Instance Details :
Configure the instance to suit your requirements. You can launch multiple instances from the same AMI, request Spot instances to take advantage of the lower pricing, assign an access management role to the instance

You can create multiple instance for same configuration in this step.


Add Storage : 
Your instance will be launched with the following storage device settings. You can attach additional EBS volumes and instance store volumes to your instance, or edit the settings of the root volume. You can also attach additional EBS volumes after launching an instance, but not instance store volumes. Learn more about storage options in Amazon EC2.


Add Tags :
A tag consists of a case-sensitive key-value pair. For example, you could define a tag with key = Name and value = Webserver.
A copy of a tag can be applied to volumes, instances or both.
Tags will be applied to all instances and volumes. Learn more about tagging your Amazon EC2 resources.
 

Configure Security Group :
A security group is a set of firewall rules that control the traffic for your instance. On this page, you can add rules to allow specific traffic to reach your instance. For example, if you want to set up a web server and allow Internet traffic to reach your instance, add rules that allow unrestricted access to the HTTP and HTTPS ports. You can create a new security group or select from an existing one below. Learn more about Amazon EC2 security groups.


Review Instance Launch :
Review your instance launch details. You can go back to edit changes for each section. Click Launch to assign a key pair to your instance and complete the launch process.

Get Public Key and Private Key File
 
Launch Status:
Server instance installation is now ready to launch.

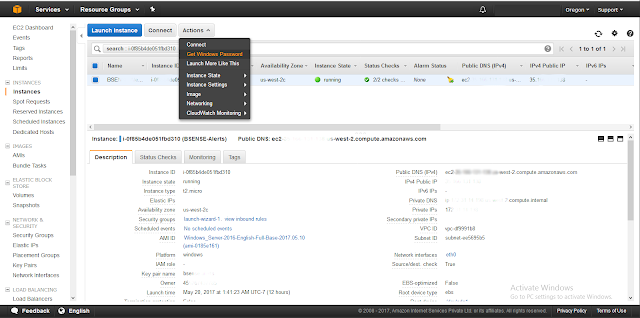
Summary of existing EC2 instance :

Get Windows Password : 


 In order to retrieve windows administration password, you need to upload "Key Pair" file which was download earlier. "instance-name.pem" file.


 See the password on screen :

Now server instance is ready to access
Use IPv4 Public IP, Username and password with Remote Desktop Connection.

Thanks

Trying to send email from Godaddy Hosting!

Its show below error:
Request for the permission of type 'System.Net.Mail.SmtpPermission,
System, Version=4.0.0.0, Culture=neutral, PublicKeyToken=b77a5c561934e089' failed.

Solution :

MailMessage mail = new MailMessage();
mail.From = new MailAddress("email address", "FriendlyName");
mail.To.Add("send to email address");
mail.Subject = "Subject for email";
mail.Body = "Some Message";
mail.IsBodyHtml = true;

SmtpClient smtp = new SmtpClient("smtp.mydomain.com");

smtp.Host = "relay-hosting.secureserver.net";
smtp.Port = 25;
smtp.EnableSsl = false;


smtp.Credentials = new NetworkCredential("email_address", "password");
smtp.Send(mail);

30 April 2015

Models:
These are the classes that represent the domain you are interested in. These domain
objects often encapsulate data stored in a database as well as code that manipulates the data
and enforces domain-specific  c business logic. With ASP.NET MVC, this is most likely a Data
Access Layer of some kind, using a tool like Entity Framework or NHibernate combined
with custom code containing domain-specific logic.

View:
This is a template to dynamically generate HTML.

Controller:
This is a special class that manages the relationship between the View and the
Model. It responds to user input, talks to the Model, and decides which view to render.

27 February 2015

ICICI Merchant Services provides Online Payment Gateway services.

This service is very easy to attachment with our existing website.

ICICI provides PHP and ASP.NET based APIs.

Here I will explain php based API implementation to our website.

Firstly it is required to download KEY from merchant account.

Login to website:

Then Generate Key from the "SFA" menu, "Key Download".

Now Apply "cacert.pem" Certificates to "sfa" folder, this file will be provide by bank.

Here is the structure of the file allocation format

Open the SFAResponse.php and made some changes

Note : Mercant ID must be same as the .key file name. e.g. if file is 00000001.key then Merchant ID must be 00000001.

According to merchant type i.e. SSL or MOTO change select the file and make the changes
e.g. if Merchant is SSL Merchant then change the TestSsl.php

Editing the sfa.properties file:

  • 'Key.Directory' should contain the name of the folder, which contains the merchant key. A trailing slash has to be included at the end of this value. The name of the file (.key file) need not be set. Save the file after making other relevant changes.
    •     Key.Directory=C://key//
    •     Note: Don’t include key in key directory path.
  • Enable the verbose parameter to “true” only when required to generate logs. These logs are to be used for debugging (while integration) and should not be set to “true” in production as it might lead to considerable amount of logs depending on the number of transactions.
  • To verify the success of the above operations open the jar file again and check if the properties file has the values set.


This is it.
All basic settings are applied for basic payment gateway implementation.

16 February 2015

Hi, today I will demonstrate you how to download / pull image from another website.

For this it is required for use below namespace :

 using System.Net;  
 using System.IO;  


Now for c# part

 private void DownloadImage(string imageURL, string FolderAndFile_NameToDownload)  
   {  
     HttpWebRequest lxRequest = (HttpWebRequest)WebRequest.Create(imageURL);  
     String lsResponse = string.Empty;  
     using (HttpWebResponse lxResponse = (HttpWebResponse)lxRequest.GetResponse())  
     {  
       using (BinaryReader reader = new BinaryReader(lxResponse.GetResponseStream()))  
       {  
         Byte[] lnByte = reader.ReadBytes(1 * 1024 * 1024 * 10);  //Buffer
         using (FileStream lxFS = new FileStream(Server.MapPath(FolderAndFile_NameToDownload), FileMode.Create))  
         {  
           lxFS.Write(lnByte, 0, lnByte.Length);  
         }  
       }  
     }  
   }  

that's all.

Two thing too keep in mind.
1)  imageURL : apply image url which you want to download.
2) FolderAndFile_NameToDownload : apply FolderName with FileName where you want to download that image in your website.

Above code can be apply fro Website as wall as Windows Form application.

12 February 2015


I have upgraded a class library project in my solution to .NET Framework 4.0. But after the upgrade there was an error as below:


Could not load file or assembly 'some_DLL_Name' or one of its dependencies. This assembly is built by a runtime newer than the currently loaded runtime and cannot be loaded.
Description: An unhandled exception occurred during the execution of the current web request. Please review the stack trace for more information about the error and where it originated in the code.

Exception Details: System.BadImageFormatException: Could not load file or assembly 'Xxxxx_DLL' or one of its dependencies. This assembly is built by a runtime newer than the currently loaded runtime and cannot be loaded.


This errors happens when the DotNet framework version is using older version than the one used to build that assembly. 

So you have to change compilation framework version same as DLL compilation version.

Web-based Asp.net IIS Setting to change version:


So just check version of every assembly reference and correct accordingly as solution of the problem.

cool

14 November 2014

Now a days we all uses HTML5 and CSS3 for any website.
So why use "loading..." image when CSS3 provides us many possibilities for the same.

Here is an example:


Here is the HTML Part :
<div class="loading-container">
    <div class="loading-progress">
        <div class="rotator">
            <div class="rotator">
                <div class="rotator colored">
                    <div class="rotator">
                        <div class="rotator colored">
                            <div class="rotator colored">
                            </div>
                            <div class="rotator">
                            </div>
                        </div>
                        <div class="rotator colored">
                        </div>
                    </div>
                    <div class="rotator">
                    </div>
                </div>
                <div class="rotator">
                </div>
            </div>
            <div class="rotator">
            </div>
        </div>
        <div class="rotator">
        </div>
    </div>
</div>

Here is the CSS3 part :

.loading-container{z-index:2000;position:fixed;top:0;left:0;right:0;bottom:0;background:rgba(0,0,0,.55)}
.loading-container.loading-inactive{display:none}
.loading-container.loading-inactive .loading-progress{display:none}
.loading-container .loading-progress{z-index:2000;position:fixed;height:10px;width:10px;margin:auto;top:0;left:0;right:0;bottom:0}
.loading-container .loading-progress .rotator{-webkit-animation:spin 30s infinite linear;-moz-animation:spin 30s infinite linear;-o-animation:spin 30s infinite linear;animation:spin 30s infinite linear}
.loading-container .loading-progress>.rotator{left:-100px}
.loading-container .rotator{-webkit-background-origin:border-box;-moz-background-origin:border-box;background-origin:border-box;background-color:#fff;width:200px;height:7px;opacity:.75;position:absolute;top:0;left:0}
.loading-container .colored{background-color:#2dc3e8!important}
        
@-webkit-keyframes spin{0%{-webkit-transform:rotate(0deg)}100%{-webkit-transform:rotate(360deg)}}
@-moz-keyframes spin{0%{-moz-transform:rotate(0deg)}100%{-moz-transform:rotate(360deg)}}
@-o-keyframes spin{0%{-o-transform:rotate(0deg);}100%{-o-transform:rotate(360deg);}}
@keyframes spin{0%{-webkit-transform:rotate(0deg);-moz-transform:rotate(0deg);-ms-transform:rotate(0deg);transform:rotate(0deg)}100%{-webkit-transform:rotate(360deg);-moz-transform:rotate(360deg);-ms-transform:rotate(360deg);transform:rotate(360deg)}}

Click here to download GitHub to see the example.

07 May 2014

Visual Studio 2013 has some cool features in IDE, one of its is Code Preview in stand of slandered scroll bar.

This feature help to navigates hundreds lines of  code.

Have a look difference between old new browser options:

Lets jump into the option.

New Behavior options for vertical scroll bar, and also available with MAP mode for Vertical Scrollbar.

Its allow 3 Preview option with Narrow, Medium and Wide.

And here its the cool view:
Vertical scroll bar changes into a code preview area. its show all color format which helps us to get quick jump when you mouse over on that scroll, its shows a readable code preview on that scroll area.

We can also split horizontal windows in Map Mode

Click and drag split icon, this option is also available in Window->Split from menu bar.

It will display something like below:
I really like to work with Map Mode in stand of classic scroll view.

Good IDE feature, isn't it?