07 September 2017
29 May 2017
 Monday, May 29, 2017
 saAction
I had a requirement to get second and forth Saturday in a month.
Here is a SQL Server query which allow to get it done.
select *
from (
select datein2n4,
datename( weekday, datein2n4 ) as wkdy,
row_number( ) over ( partition by datepart( month, datein2n4 ), datename( weekday, datein2n4 ) order by datein2n4 ) as rn_dy_mth
from (
select dateadd( day, rn, cast( '2017-05-29 00:00:00' as date ) ) as datein2n4
from (
select row_number() over( order by object_id ) - 1 as rn
from sys.columns
) as rn
) as dy
) as dy_mth
where rn_dy_mth in ( 2, 4 )
and wkdy = 'Saturday'
order by datein2n4
26 May 2017
 Friday, May 26, 2017
 saAction
Creating Database using Amazon RDS is very eary.
See detailed documentation about creating a Microsoft SQL Server DB Instance and Connecting to a DB Instance
After that you can connect SQL Server from SQL Server Management Studio.
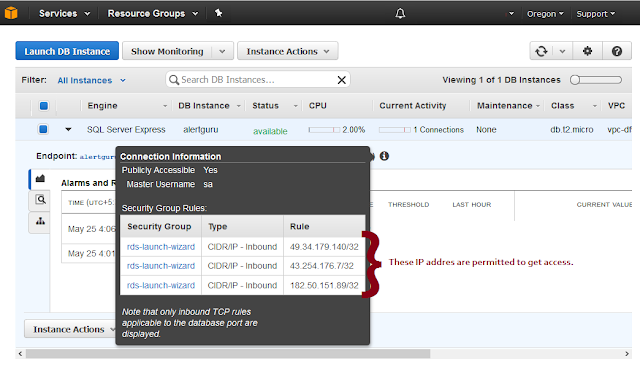
Amazon automatically configured Inbound permission to the IP from which it is created from.
While connecting from other PC or Hosting server you will receive bellow error:
A network-related or instance-specific error occurred while establishing a connection to SQL Server. The server was not found or was not accessible. Verify that the instance name is correct and that SQL Server is configured to allow remote connections. (provider: Named Pipes Provider, error: 40 - Could not open a connection to SQL Server) (Microsoft SQL Server, Error: 53)
Also connection Asp.net website you need to apply Connection String by:
Solution :
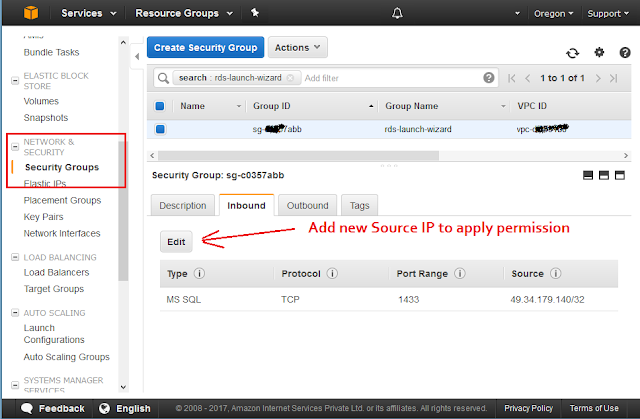
You need to apply INBOUND rules for permission to that IP
In Security Group option
You can use WhatIsMyIp.com to get Source IP address.
Amazon has its own Check IP website : http://checkip.amazonaws.com/
Thanks
See detailed documentation about creating a Microsoft SQL Server DB Instance and Connecting to a DB Instance
After that you can connect SQL Server from SQL Server Management Studio.
Amazon automatically configured Inbound permission to the IP from which it is created from.
While connecting from other PC or Hosting server you will receive bellow error:
A network-related or instance-specific error occurred while establishing a connection to SQL Server. The server was not found or was not accessible. Verify that the instance name is correct and that SQL Server is configured to allow remote connections. (provider: Named Pipes Provider, error: 40 - Could not open a connection to SQL Server) (Microsoft SQL Server, Error: 53)
Solution :
You need to apply INBOUND rules for permission to that IP
In Security Group option
You can use WhatIsMyIp.com to get Source IP address.
Amazon has its own Check IP website : http://checkip.amazonaws.com/
Thanks
25 May 2017
 Thursday, May 25, 2017
 saAction
Amazon Web Service EC2 configuration is very very easy!
Its totally free service.
EC2 stands for Amazon Elastic Compute Cloud.
URL : https://console.aws.amazon.com/ec2
Help : https://aws.amazon.com/documentation/ec2/
Select EC2 :
Choose an Amazon Machine Image (AMI), Operating System Selection:
An AMI is a template that contains the software configuration (operating system, application server, and applications) required to launch your instance. You can select an AMI provided by AWS, our user community, or the AWS Marketplace; or you can select one of your own AMIs.
Choose an Instance Type :
Amazon EC2 provides a wide selection of instance types optimized to fit different use cases. Instances are virtual servers that can run applications. They have varying combinations of CPU, memory, storage, and networking capacity, and give you the flexibility to choose the appropriate mix of resources for your applications. Learn more about instance types and how they can meet your computing needs.
Configure Instance Details :
Configure the instance to suit your requirements. You can launch multiple instances from the same AMI, request Spot instances to take advantage of the lower pricing, assign an access management role to the instance
You can create multiple instance for same configuration in this step.
Add Storage :
Your instance will be launched with the following storage device settings. You can attach additional EBS volumes and instance store volumes to your instance, or edit the settings of the root volume. You can also attach additional EBS volumes after launching an instance, but not instance store volumes. Learn more about storage options in Amazon EC2.
Add Tags :
A tag consists of a case-sensitive key-value pair. For example, you could define a tag with key = Name and value = Webserver.
A copy of a tag can be applied to volumes, instances or both.
Tags will be applied to all instances and volumes. Learn more about tagging your Amazon EC2 resources.
Configure Security Group :
A security group is a set of firewall rules that control the traffic for your instance. On this page, you can add rules to allow specific traffic to reach your instance. For example, if you want to set up a web server and allow Internet traffic to reach your instance, add rules that allow unrestricted access to the HTTP and HTTPS ports. You can create a new security group or select from an existing one below. Learn more about Amazon EC2 security groups.
Review Instance Launch :
Review your instance launch details. You can go back to edit changes for each section. Click Launch to assign a key pair to your instance and complete the launch process.
Get Public Key and Private Key File
Launch Status:
Server instance installation is now ready to launch.
Summary of existing EC2 instance :
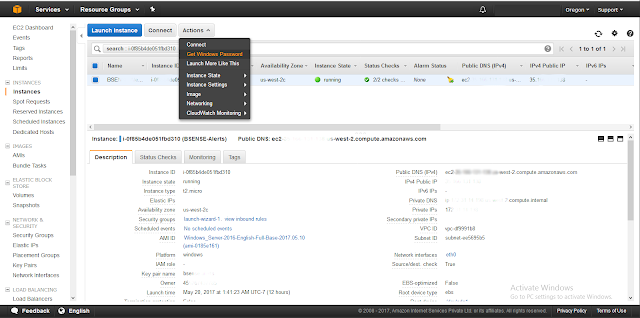
Get Windows Password :

See the password on screen :
Now server instance is ready to access
Use IPv4 Public IP, Username and password with Remote Desktop Connection.
Thanks
Its totally free service.
EC2 stands for Amazon Elastic Compute Cloud.
URL : https://console.aws.amazon.com/ec2
Help : https://aws.amazon.com/documentation/ec2/
Select EC2 :
Resource Summary Page:
Click on "Launch Instance"
Choose an Amazon Machine Image (AMI), Operating System Selection:
An AMI is a template that contains the software configuration (operating system, application server, and applications) required to launch your instance. You can select an AMI provided by AWS, our user community, or the AWS Marketplace; or you can select one of your own AMIs.
Choose an Instance Type :
Amazon EC2 provides a wide selection of instance types optimized to fit different use cases. Instances are virtual servers that can run applications. They have varying combinations of CPU, memory, storage, and networking capacity, and give you the flexibility to choose the appropriate mix of resources for your applications. Learn more about instance types and how they can meet your computing needs.
Configure Instance Details :
Configure the instance to suit your requirements. You can launch multiple instances from the same AMI, request Spot instances to take advantage of the lower pricing, assign an access management role to the instance
You can create multiple instance for same configuration in this step.
Add Storage :
Your instance will be launched with the following storage device settings. You can attach additional EBS volumes and instance store volumes to your instance, or edit the settings of the root volume. You can also attach additional EBS volumes after launching an instance, but not instance store volumes. Learn more about storage options in Amazon EC2.
Add Tags :
A tag consists of a case-sensitive key-value pair. For example, you could define a tag with key = Name and value = Webserver.
A copy of a tag can be applied to volumes, instances or both.
Tags will be applied to all instances and volumes. Learn more about tagging your Amazon EC2 resources.
A security group is a set of firewall rules that control the traffic for your instance. On this page, you can add rules to allow specific traffic to reach your instance. For example, if you want to set up a web server and allow Internet traffic to reach your instance, add rules that allow unrestricted access to the HTTP and HTTPS ports. You can create a new security group or select from an existing one below. Learn more about Amazon EC2 security groups.
Review Instance Launch :
Review your instance launch details. You can go back to edit changes for each section. Click Launch to assign a key pair to your instance and complete the launch process.
Get Public Key and Private Key File
Launch Status:
Server instance installation is now ready to launch.
Summary of existing EC2 instance :
Get Windows Password :

In order to retrieve windows administration password, you need to upload "Key Pair" file which was download earlier. "instance-name.pem" file.
Now server instance is ready to access
Use IPv4 Public IP, Username and password with Remote Desktop Connection.
Thanks
 Thursday, May 25, 2017
 saAction
Trying to send email from Godaddy Hosting!
Its show below error:
Request for the permission of type 'System.Net.Mail.SmtpPermission,
System, Version=4.0.0.0, Culture=neutral, PublicKeyToken=b77a5c561934e089' failed.
Solution :
MailMessage mail = new MailMessage();
mail.From = new MailAddress("email address", "FriendlyName");
mail.To.Add("send to email address");
mail.Subject = "Subject for email";
mail.Body = "Some Message";
mail.IsBodyHtml = true;
SmtpClient smtp = new SmtpClient("smtp.mydomain.com");
smtp.Host = "relay-hosting.secureserver.net";
smtp.Port = 25;
smtp.EnableSsl = false;
smtp.Credentials = new NetworkCredential("email_address", "password");
smtp.Send(mail);
Subscribe to:
Comments
(
Atom
)


